A Capture choice adds text to a note without opening it. Press a hotkey, type your entry, and QuickAdd files it exactly where it belongs - while you stay right where you are. Use it to:
- Add timestamped entries to your daily note
- Log work under the right heading of a project note
- Save interesting links for later reading
Set up your first capture
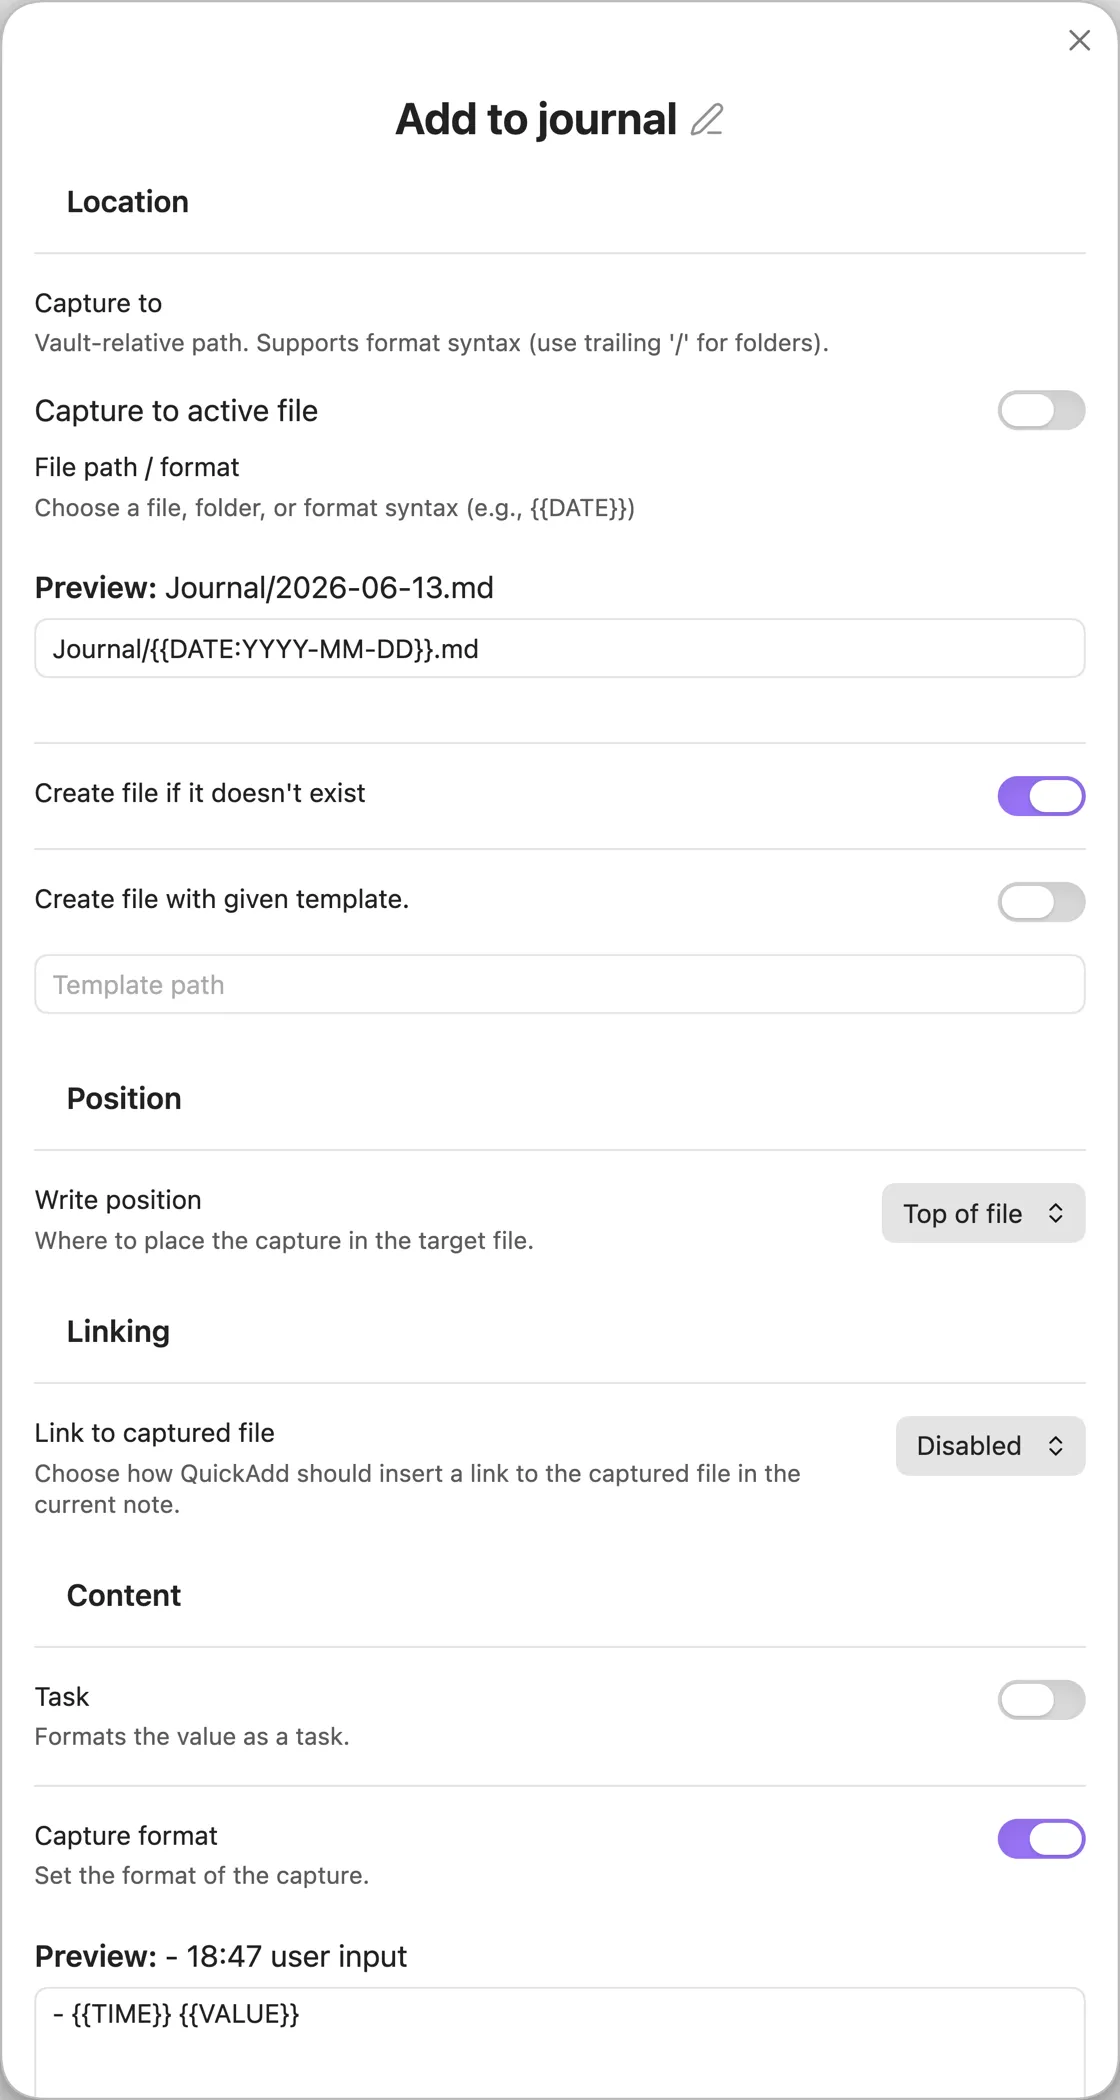
Section titled “Set up your first capture”- Open Settings → QuickAdd, type a name like
Add to journal, choose Capture in the dropdown, and click Add Choice. - Click the gear (⚙) next to the new choice.
- Set Capture To to where entries should land, for example
Journal/{{DATE}}.md. - Enable Capture format and describe one entry, for example
- {{DATE:HH:mm}} {{VALUE}}. - Run it: command palette →
QuickAdd: Run, pickAdd to journal, type your entry.
You now have this in today’s journal note:
- 09:42 Standup moved to WednesdayAssign the choice a hotkey (⚡ icon, or Obsidian’s Hotkeys settings) once it behaves the way you want.
Choose where it goes: Capture To
Section titled “Choose where it goes: Capture To”Capture To is the note you are capturing to. Either enable Capture to active file to write into the note you are currently in, or enter a file path.
The path supports format syntax, so it can be dynamic. A daily journal capture might use:
Journal/{{DATE:gggg-MM-DD - ddd MMM D}}.mdEvery run finds today’s file, and your entry is captured to it.
File names are Markdown-first:
- No extension means a Markdown file:
InboxtargetsInbox.md. - An explicit supported extension (
.md,.canvas) is kept. .basefiles are not supported as capture targets - use a Template choice for.baseworkflows.
How QuickAdd picks the target
Section titled “How QuickAdd picks the target”When Capture to active file is off, the resolved File path / format value decides what happens:
| You write | What happens |
|---|---|
Inbox.md (or any path with an extension) | Captures straight to that file |
nothing, or / | Opens a picker with every Markdown note in the vault |
Projects/ (trailing slash) | Opens a picker confined to that folder |
Projects (existing folder, no extension) | Same picker, unless Projects.md exists - then the file wins |
#people | Picker with notes carrying that tag |
property:type=draft | Picker with notes whose frontmatter matches - see capturing to a property |
Paths are vault-relative; a leading / is ignored (except a lone /, which
opens the whole-vault picker).
The picker is ordered like Obsidian’s Quick Switcher: notes you opened most recently come first, then everything else alphabetically. Ordering ignores modification time on purpose, so a sync that touches old notes doesn’t push them to the top. Files in Obsidian’s Excluded files list sink to the bottom but stay selectable.
You can also type a new name into the picker: with Create file if it doesn’t exist enabled, a Create new note: <name> row appears and QuickAdd creates the note for you. The row hides when the typed name matches an existing note in scope, so typing an existing name selects it instead of offering a duplicate. The picker still opens for an empty folder, tag, property, or filtered scope so you can create the first note there.
Capture to a folder
Section titled “Capture to a folder”Type a folder name (like CRM/people) and QuickAdd asks which note in that
folder to capture to - nested folders included. Format syntax works here too.
For example: you keep one note per person in CRM/people. Set Capture To to
CRM/people, run the capture, and pick the person. Type John Doe instead
and QuickAdd creates CRM/people/John Doe.md (with Create file if it
doesn’t exist enabled).
Capture to a tag
Section titled “Capture to a tag”Type a tag (like #people) and QuickAdd asks which note carrying that tag to
capture to.
Filter by folders and tags together
Section titled “Filter by folders and tags together”Combine filters with | when the destination could live in several folders,
or must match several tags:
| You write | The picker shows |
|---|---|
folder:Goals|folder:Projects | Notes in either folder |
tag:active|tag:work | Notes with both tags |
folder:Goals|folder:Projects|tag:active | Active notes in either folder |
folder:Goals|exclude-folder:Archive|exclude-tag:done | Goals that aren’t archived or done |
Repeated folder: filters are OR filters. Repeated tag: filters are AND
filters. Exclusions remove any matching file.
Capture still writes to one destination per run. To select several related
notes for metadata, use the {{FILE:<folder>|multi}}
placeholder in the capture format instead.
Introduced in QuickAdd 2.14.0.
Capture to notes with a matching property
Section titled “Capture to notes with a matching property”Type property:<field>=<value> to limit the picker to notes whose frontmatter
matches. If your notes have a type field, property:type=draft opens a
picker containing only the notes whose type is draft.
property:type=draft- notes whosetypeequalsdraft.property:type- notes that have atypefield, whatever the value.- Matching is case-insensitive and trimmed. For a list property (
type: [draft, idea]), the note matches if any entry equals the value. - The value supports format syntax:
property:status={{VALUE}}asks when the capture runs.
Combine with the shared file filters using |, the same syntax as
{{FIELD}}:
property:type=draft|folder:Notes- only drafts insideNotes/.property:type=draft|exclude-folder:Archive- drafts not inArchive/.property:type=draft|exclude-tag:done- drafts not tagged#done.
Good to know:
- Matches YAML frontmatter only, not inline Dataview
field:: valuefields. - The field name matches case-insensitively (
property:typematches aType:field), and value matching is always case-insensitive. - Only the
folder:/tag:/exclude-folder:/exclude-tag:/exclude-file:pipe filters are applied here. - Because
|starts a filter, a property value cannot itself contain|. - Typing a new note name (with Create file if it doesn’t exist) creates the note, but does not automatically give it the property.
Introduced in QuickAdd 2.14.0.
Send one entry to several notes
Section titled “Send one entry to several notes”Capture writes to one destination per run. To write the same entry to several fixed notes, compose Capture choices with a Macro:
- Create one Capture choice per destination.
- Give each the same named value, for example
- {{VALUE:entry}}. - Create a Macro and add each Capture choice as a Nested Choice command.
- Run the Macro: QuickAdd prompts for
entryonce and reuses the answer.
| Choice | Capture To | Format |
|---|---|---|
| Log to Person A | People/Person A.md | - {{VALUE:entry}} |
| Log to Person B | People/Person B.md | - {{VALUE:entry}} |
If the destinations are dynamic, use one Capture choice with a formatted target and run it repeatedly from a user script:
| Setting | Value |
|---|---|
| Capture To | People/{{VALUE:person}}.md |
| Format | - {{VALUE:entry}} |
module.exports = async ({ quickAddApi }) => {  const entry = await quickAddApi.inputPrompt("Entry");  const people = await quickAddApi.checkboxPrompt([    "Person A",    "Person B",    "Person C",  ]);
  for (const person of people) {    await quickAddApi.executeChoice("Log event to person", {      entry,      person,    });  }};
Pass the variables object on every executeChoice call - each call clears its
temporary variables after the choice runs.
Friendlier names in the picker
Section titled “Friendlier names in the picker”The picker labels each note by its frontmatter title when available, then
its first level-1 heading, then its file name. The selected destination is
always the real file, so captures write to the same place even when the label
is friendlier than the filename.
Shape the entry: Capture format
Section titled “Shape the entry: Capture format”Capture format is what actually gets written - think of it as a mini
template for one entry. When disabled, QuickAdd writes {{VALUE}}: whatever
you type in the prompt (or your editor selection, if selection-as-value is
enabled).
All of format syntax works here:
- {{DATE:HH:mm}} {{VALUE}}- 09:42 Called the bankFor a long format, keep it in a note and reference it:
{{TEMPLATE:Templates/Capture Format.md}}QuickAdd inserts the file’s contents, then processes the result like any
capture format - the file can contain {{VALUE}}, {{DATE}},
{{MACRO:...}}, inline scripts, and further {{TEMPLATE:...}} includes
(.md, .canvas, and .base files; include the extension). This lets you
edit, version, and reuse a complete capture format as a normal note. The
one-page input form and quickadd:check scan
referenced template files too, so their prompts appear up front.
If your format includes an inline js quickadd block and you need to
transform input, read input in script code via
this.quickAddApi.inputPrompt(...) and assign variables on this.variables -
don’t put {{VALUE}} inside JavaScript string literals. See
Inline scripts.
The options, one by one
Section titled “The options, one by one”The Capture builder groups its settings into Location, Position, Linking, Content, and Behavior.
Create the note if it’s missing
Section titled “Create the note if it’s missing”Create file if it doesn’t exist does what it says. Optionally create the file from a template - an input for the template file appears below the setting.
Format the entry as a task
Section titled “Format the entry as a task”Task formats your captured text as a task (- [ ] ...).
Use your selection as the answer
Section titled “Use your selection as the answer”Use editor selection as default value controls whether selected text in the
editor is used as {{VALUE}} instead of prompting: Follow global setting,
Use selection, or Ignore selection (the global default lives in
Settings → Input). This does not affect {{selected}}.
Pick where in the note it lands: Write position
Section titled “Pick where in the note it lands: Write position”Write position controls where in the note the entry is written. The options depend on whether Capture to active file is enabled:
- At cursor (active file) / Top of file (target file) - the first option’s label changes with the mode
- Top of file (after frontmatter) (active file only)
- New line above cursor / New line below cursor (active file only)
- After line… - insert after a target line you specify, or pick a heading at run time. The workhorse for structured notes - see Insert after.
- Before line… - see Insert before
- Bottom of file
Link back to the captured note
Section titled “Link back to the captured note”Link to captured file inserts a link to the note you captured to - useful for leaving a trail in the note you were in. Three modes:
- Enabled (strict) - require the configured link destination to be available
- Enabled (skip if unavailable) - insert the link when possible, silently skip when nothing is open
- Disabled - never insert a link
With either enabled mode, Link destination controls where the link goes:
- Current note - insert into the active editor
- Specified note - append to the bottom of a chosen note (an index or MOC, for example) without opening it. QuickAdd validates the destination before writing. It appends a plain link only: it won’t create the index file, insert under a heading, update properties, or dedupe links.
For Current note, strict mode requires a focused Markdown editor (except Canvas-triggered captures, which skip link insertion when no Markdown editor is available).
Where the link is placed
Section titled “Where the link is placed”For the Current note destination, Link placement chooses the spot:
- Replace selection - replace any selected text with the link (default)
- After selection - keep the selected text, place the link after it
- End of line - at the end of the current line
- New line - on a new line below the cursor
- In frontmatter property - add the link to a named frontmatter property
For In frontmatter property, set the property name and how strictly to handle missing or non-list properties:
- Create or convert (default) - create the property if missing, or convert an existing scalar value into a list before appending. Object values still error.
- Create if missing - create the property if missing; existing scalar/object values error.
- Require list - append only to an existing list property. Empty/null count as empty lists; missing properties and scalar/object values error.
Link or embed
Section titled “Link or embed”For the body placements (Replace selection, After selection, End of
line, New line), a Link type dropdown chooses Link ([[Note]]) or
Embed (![[Note]]). An embed transcludes the captured note’s contents at
the placement position. In frontmatter property and the Specified
note destination stay link-only.
What the link says
Section titled “What the link says”For the selection placements with the Link type, Link display text
chooses the visible text. Selected text keeps your highlight as the
display text: selecting Meeting with Mark and capturing to
20240101 Meeting with Mark inserts
[[20240101 Meeting with Mark|Meeting with Mark]]. With nothing selected (or
a selection that can’t sit safely inside a link), the plain link is inserted.
Multi-line selections collapse to one line, and vaults using Markdown-style
links get [Meeting with Mark](20240101%20Meeting%20with%20Mark.md).
Copy a link to the clipboard
Section titled “Copy a link to the clipboard”Copy link to clipboard copies a link to the captured note after the capture runs - independent of Link to captured file, so you can copy without inserting, or do both. The copied link is a vault-path wikilink, ready to paste into another note.
Open the captured note
Section titled “Open the captured note”When Capture to active file is off, the Behavior section shows an Open toggle. Enabling it reveals:
- File Opening Location - Reuse current tab, New tab, Split pane, New window, Left sidebar, or Right sidebar
- Split Direction - Split right or Split down (shown for Split pane)
- View Mode - Source, Preview, Live Preview, or Default
- Focus new pane - focus the opened tab immediately (shown for every location except Reuse current tab)
When QuickAdd opens and focuses a Markdown target in an editable mode, it places the cursor at the end of the inserted capture so you can keep typing. This is skipped for preview/unfocused opens and when Templater cursor markers take over.
Run Templater on the whole file afterwards
Section titled “Run Templater on the whole file afterwards”Run Templater on entire destination file after capture is an advanced,
legacy option: it executes any <% %> anywhere in the destination file,
including inside code blocks. Leave it off unless you specifically need that
whole-file pass.
Templater and newly created notes
Section titled “Templater and newly created notes”Capture has two Templater paths when it creates a missing Markdown file:
- Create file if it doesn’t exist without a QuickAdd template: QuickAdd creates a blank file first. If Templater’s new-file trigger applies to that location, QuickAdd waits for Templater to finish before inserting the capture.
- Create with template: QuickAdd owns the initial content. It renders the selected QuickAdd template, suppresses Templater’s new-file/directory trigger for that creation, then runs Templater once on the content QuickAdd wrote.
So a blank Capture-created file can receive Templater’s directory template first, while a template-created file runs Templater on QuickAdd’s template content instead.
Insert after
Section titled “Insert after”After line… inserts the entry after a line with the text you specify -
this is how entries land under the right heading. A journal capture might
insert after ## What did I do today?.
By default, QuickAdd preserves blank lines after headings to keep spacing intact. Blank lines after match controls this:
- Auto (headings only) - skip blank lines only when the matched line is a heading
- Always skip - skip all consecutive blank lines after the match
- Never skip - insert immediately after the matched line
Example (Auto, insert after # H with content X):
# H
XA
With Insert after you can also enable Insert at end of section and Consider subsections - see below.
Create line if not found creates the target line when it doesn’t exist - useful when the heading might not be in the note yet. The created line can go at the Top or Bottom of the file, at your Cursor, or Ordered - sorted among same-level headings; see Ordered section placement for reverse-chronological logs and changelogs.
The target may span several lines: type \n in the Insert after field to
match a multi-line anchor (the preview shows it expanded). Inline
insertion is the exception - it inserts on the same line, so its target must
be a single line; a \n target there is rejected with a notice.
Ordered section placement
Section titled “Ordered section placement”When Create line if not found is set to Ordered (full label:
Ordered (place new section among siblings)), a missing “Insert after”
heading is created at its sorted position among same-level headings. This
is the building block for a reverse-chronological log: each new dated section
is added above older ones, while a fixed title stays pinned at the top.
The classic “daily log, newest first” recipe (issue #481):
- Capture to: your log note (enable
Create file if it doesn't existto auto-create it) - Format: the entry with a trailing newline, e.g.
- {{DATE:HH:mm}} {{VALUE}}\n(task captures add their own newline) - Insert after: the day heading,
## {{DATE:YYYY-MM-DD}} - Insert at end of section: off, so each entry lands directly under the day heading (newest first within the day)
- Create line if not found: on, location Ordered, Sort sections by =
Date, Section order =Newest / highest first
Running it on consecutive days (and twice in one day) produces:
# My Daily Log
A short intro that always stays at the top.
## 2026-06-16- 09:40 reviewed the code- 09:13 started the design
## 2026-06-14- 09:00 older entry
The first capture of a day creates ## 2026-06-16 below the intro and above
## 2026-06-14; later captures that day find the existing heading and add
their entry on top. The # My Daily Log title stays put because only
same-level headings (##) are sorted against each other, and YAML frontmatter
is never treated as a heading.
Sort options
Section titled “Sort options”With Ordered selected, these controls appear:
- Sort sections by - how the sort key is read from each heading:
Insertion order (no sorting)- newest-first prepends the new section; oldest-first appends it. No parsing.Text (A→Z)- case-insensitive text compare.Number- the leading number in the heading (e.g.## 12 Project X).Date- parsed with a Date format (auto-detected from the{{DATE:…}}placeholder in your “Insert after” text, and editable). Trailing decoration like## 2026-06-14 (Friday)is ignored.Version (semver)-major.minor.patch, so1.10.0sorts above1.9.0. A leadingvand the Keep-a-Changelog## [1.10.0] - 2026-06-16form are both understood.
- Section order -
Newest / highest firstorOldest / lowest first. - Existing unparseable headings (for
Date,Number,Version (semver)) - where to rank headings that can’t be parsed for the chosen key (like## Unreleasedin a changelog): sort to bottom (default) or top. A new heading that can’t be parsed is always appended at the end.
Use Insert at end of section to control order within each section: off = newest entry on top (date logs), on = entries appended at the end (changelogs).
More examples
Section titled “More examples”A changelog with the newest version on top - Insert after
## {{VALUE:version}}, Format - {{VALUE:change}}\n, Insert at end of
section on, Create line if not found on → Ordered, Sort by
Version (semver), Order Newest / highest first:
# Changelog
## 1.10.0- new feature- another fix in 1.10.0
## 1.9.0- old fix
A “books read” note grouped by year - Insert after ## {{DATE:YYYY}},
Format - {{VALUE}}\n, Create line if not found on → Ordered,
Sort by Date with Date format YYYY, Order Newest / highest first.
Notes and limits
Section titled “Notes and limits”- The heading is created once and reused - every later capture finds it, so the section is never duplicated. This relies on the heading resolving to the same text each time: use a stable placeholder (
{{DATE:…}}, a{{VALUE:…}}you supply), not a random one. - Sorting covers all same-level headings in the note, not one parent section. For the layouts above (dated/versioned
##sections under one#title) that’s exactly right - keep the fixed title at a different heading level so it’s never a sortable sibling. - Ordered placement positions the new section only; it doesn’t re-sort existing ones.
- Ordered is for headings and can’t be combined with Inline insertion.
Introduced in QuickAdd 2.14.0.
Choose the heading when capturing
Section titled “Choose the heading when capturing”Instead of typing the target line when you build the choice, enable Choose heading when capturing to pick it at run time: QuickAdd reads the target note and shows a dropdown of its headings - pick one, and the entry is inserted under it. Useful when the heading varies between runs, or when you’d rather not remember it.
The picked heading simply becomes the insert-after target, so every placement control still applies: Insert at end of section, Consider subsections, Blank lines after match, and Create line if not found work exactly as usual.
Good to know:
- You can type a heading that doesn’t exist yet; enable
Create line if not foundto have QuickAdd create it (type it with its#markers, e.g.## Tasks). - The dropdown lists ATX headings (lines starting with
#). For a brand-new note created from a template, the picker can’t list the template’s headings (the note doesn’t exist at pick time) - type the heading and useCreate line if not found. - With the one-page input form, the heading dropdown still appears as a separate step after the form.
Introduced in QuickAdd 2.14.0.
Consider subsections
Section titled “Consider subsections”Controls whether a section’s nested subsections count as part of it when using Insert at end of section.
Disabled - the section ends where its first subsection starts:
## 1. First heading
**Insert after** comes here.
-   content 1-   content 2-   content 3    **Insert at end** comes here.
### 1.1. Nested heading 1
Content
## 2. Another heading
Content
Enabled - subsections belong to the section, so “end of section” is after them:
## 1. First heading
**Insert after** comes here
-   content 1-   content 2-   content 3
### 1.1. Nested heading 1
Content**Insert at end** comes here. Captures to after this, as it's considered part of the "1. First heading" section.
## 2. Another heading
Content
Insert before
Section titled “Insert before”Before line… inserts the capture before the first line matching the text
you specify. The target accepts format syntax, so
values like {{title}} and {{linkcurrent}} work in the match text.
Create line if not found works here too: QuickAdd writes the captured content first, then creates the missing line below it. The created line can go at the start or end of the file, or at your cursor.
Capture to Canvas
Section titled “Capture to Canvas”QuickAdd supports two Canvas capture workflows:
- Capture to the selected card in the active Canvas view
- Capture to a specific card in a specific
.canvasfile
Capture to the selected card
Section titled “Capture to the selected card”Enabled when Capture to active file is on and the active view is a Canvas. Supported card targets:
- Text cards
- File cards that point to Markdown files
Capture to a card in a specific file
Section titled “Capture to a card in a specific file”Enabled when Capture to active file is off, the capture path resolves to
a .canvas file, and Target canvas node is set. When the path is a
.canvas file, QuickAdd shows a node picker so you can choose the card
directly from that board.
Write positions in Canvas
Section titled “Write positions in Canvas”- Text cards and file cards (Markdown targets) support: Top of file, Bottom of file, After line…, Before line…
- Cursor-based modes (At cursor, New line above/below cursor) don’t exist in Canvas. If Capture to active file is on and the write position is still the default At cursor, the capture aborts until you switch to a supported mode.
Selected-card mode needs exactly one selected card. If the selection is missing, multiple, or unsupported, QuickAdd aborts with a notice instead of writing to the wrong place.
When append-link is Enabled (requires active file) and the capture runs from a Canvas card without a focused Markdown editor, the capture still writes and link insertion is skipped.
For a step-by-step setup, see Capture: Canvas Capture.
Canvas capture FAQ
Section titled “Canvas capture FAQ”Why did my capture abort in Canvas? Most often: no card selected, more than one card selected, an unsupported card type, or a cursor-based write position.
Can I target a specific card in a Canvas file? Yes - set the capture path
to a .canvas file and choose a Target canvas node.
Does “At cursor” work in Canvas cards? No. Use top, bottom, insert-after, or insert-before placement.
Can I capture to a file card that points to a Canvas file? No - file-card capture supports Markdown targets only.
Can I still create new Canvas files from templates? Yes. Template choices
support .canvas templates.