AI Assistant
The AI Assistant in QuickAdd leverages the power of Large Language Models (LLMs) to act as your personal AI assistant within Obsidian. It can streamline your workflows by automating routine tasks and providing intellectual support. To use this feature, you need the QuickAdd plugin and a provider you'd like to use.
How to Setup the AI Assistant
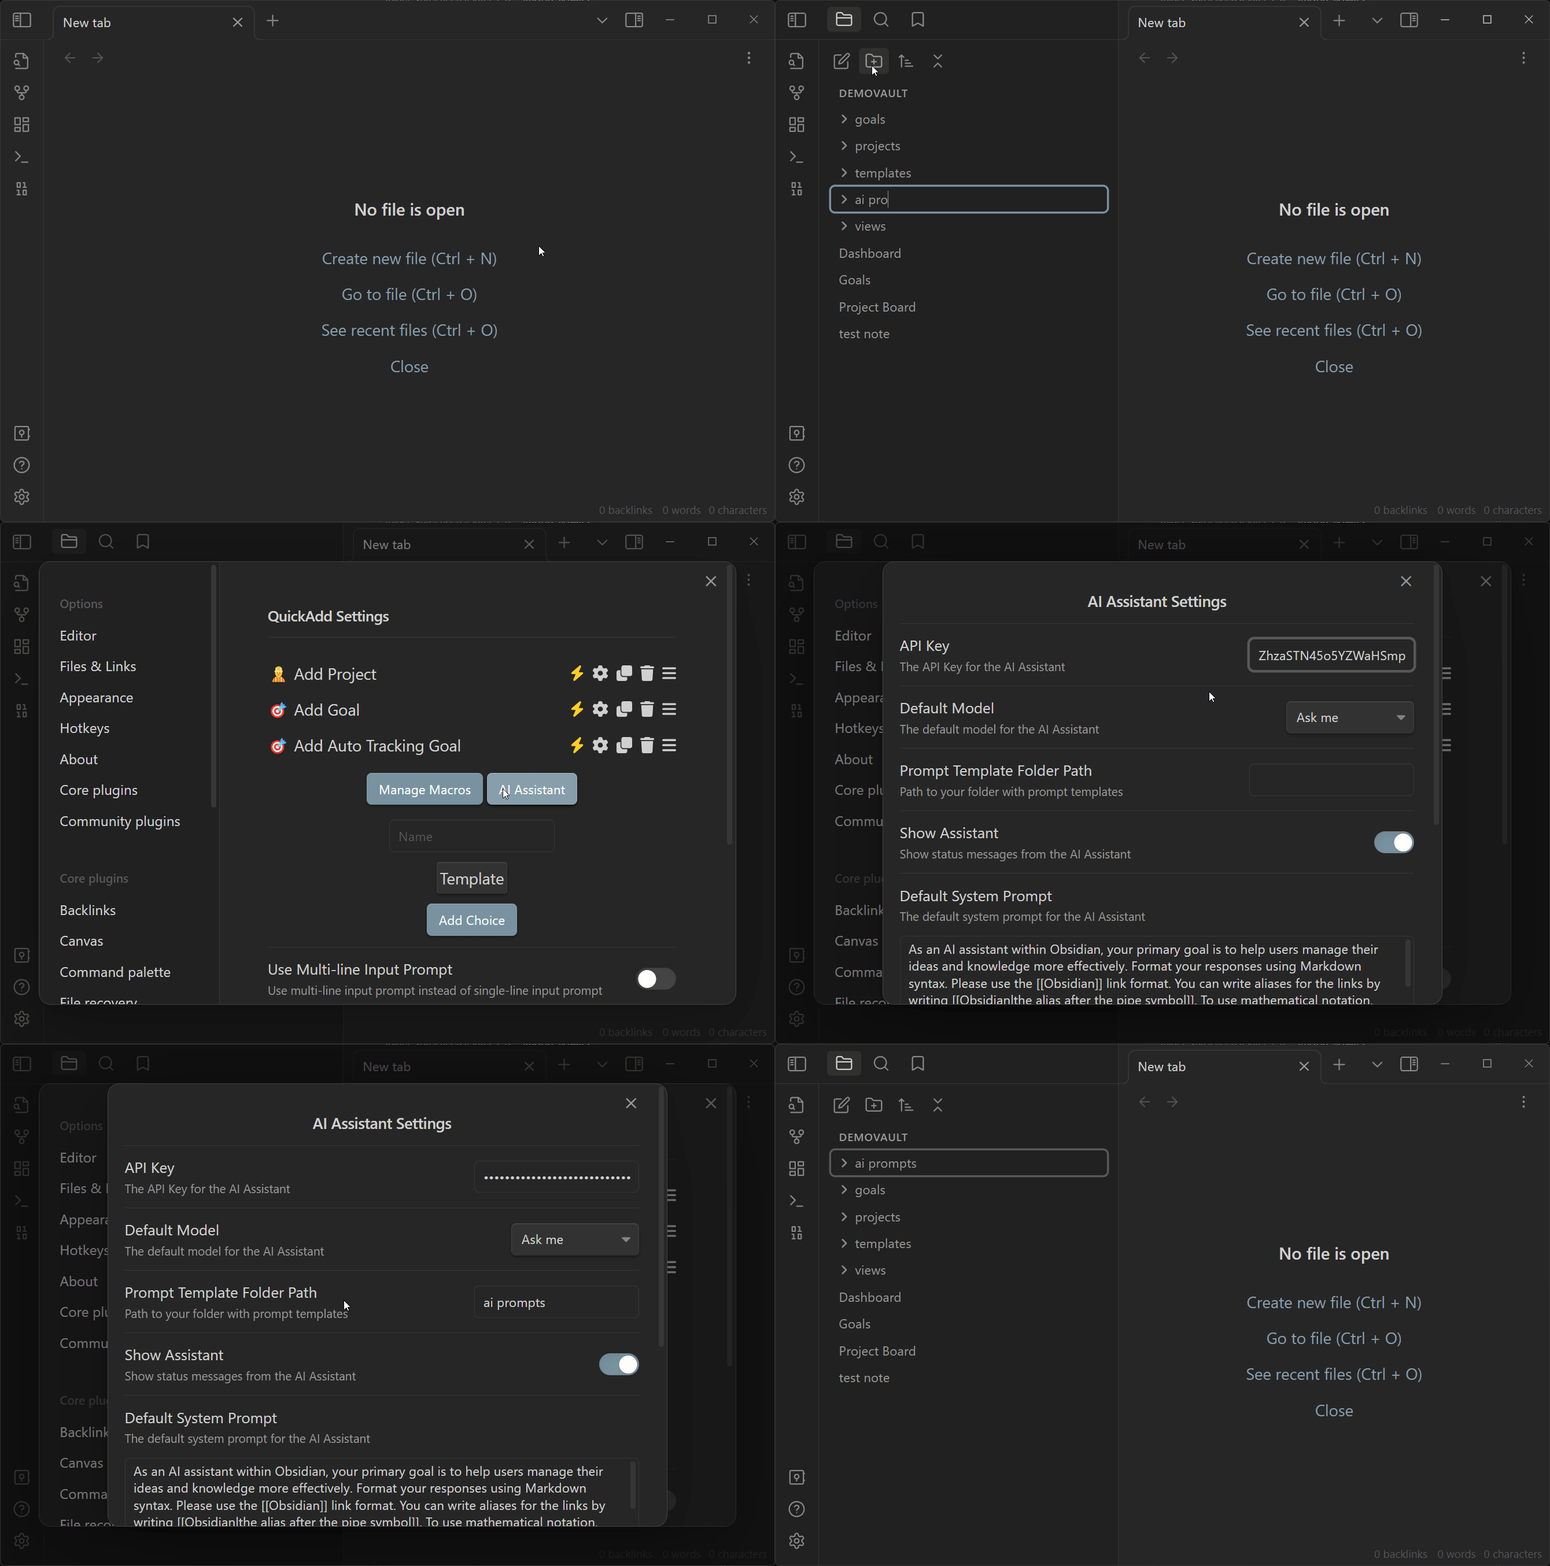
To set up the AI Assistant, follow these steps:
- In Obsidian, create a new folder dedicated to AI prompt templates, e.g.
bins/ai_prompts. - Navigate to QuickAdd settings and locate the "AI Assistant" section. Specify the path to the folder you created in step 1.
- In the same section, add a provider to get started. If you are using OpenAI, you will need to add your API key to the settings. As of v1.8.x, you need to enter your API key in the provider settings. The video below is from an older version, but the process is the similar.

That's really it. You're now ready to use the AI Assistant.
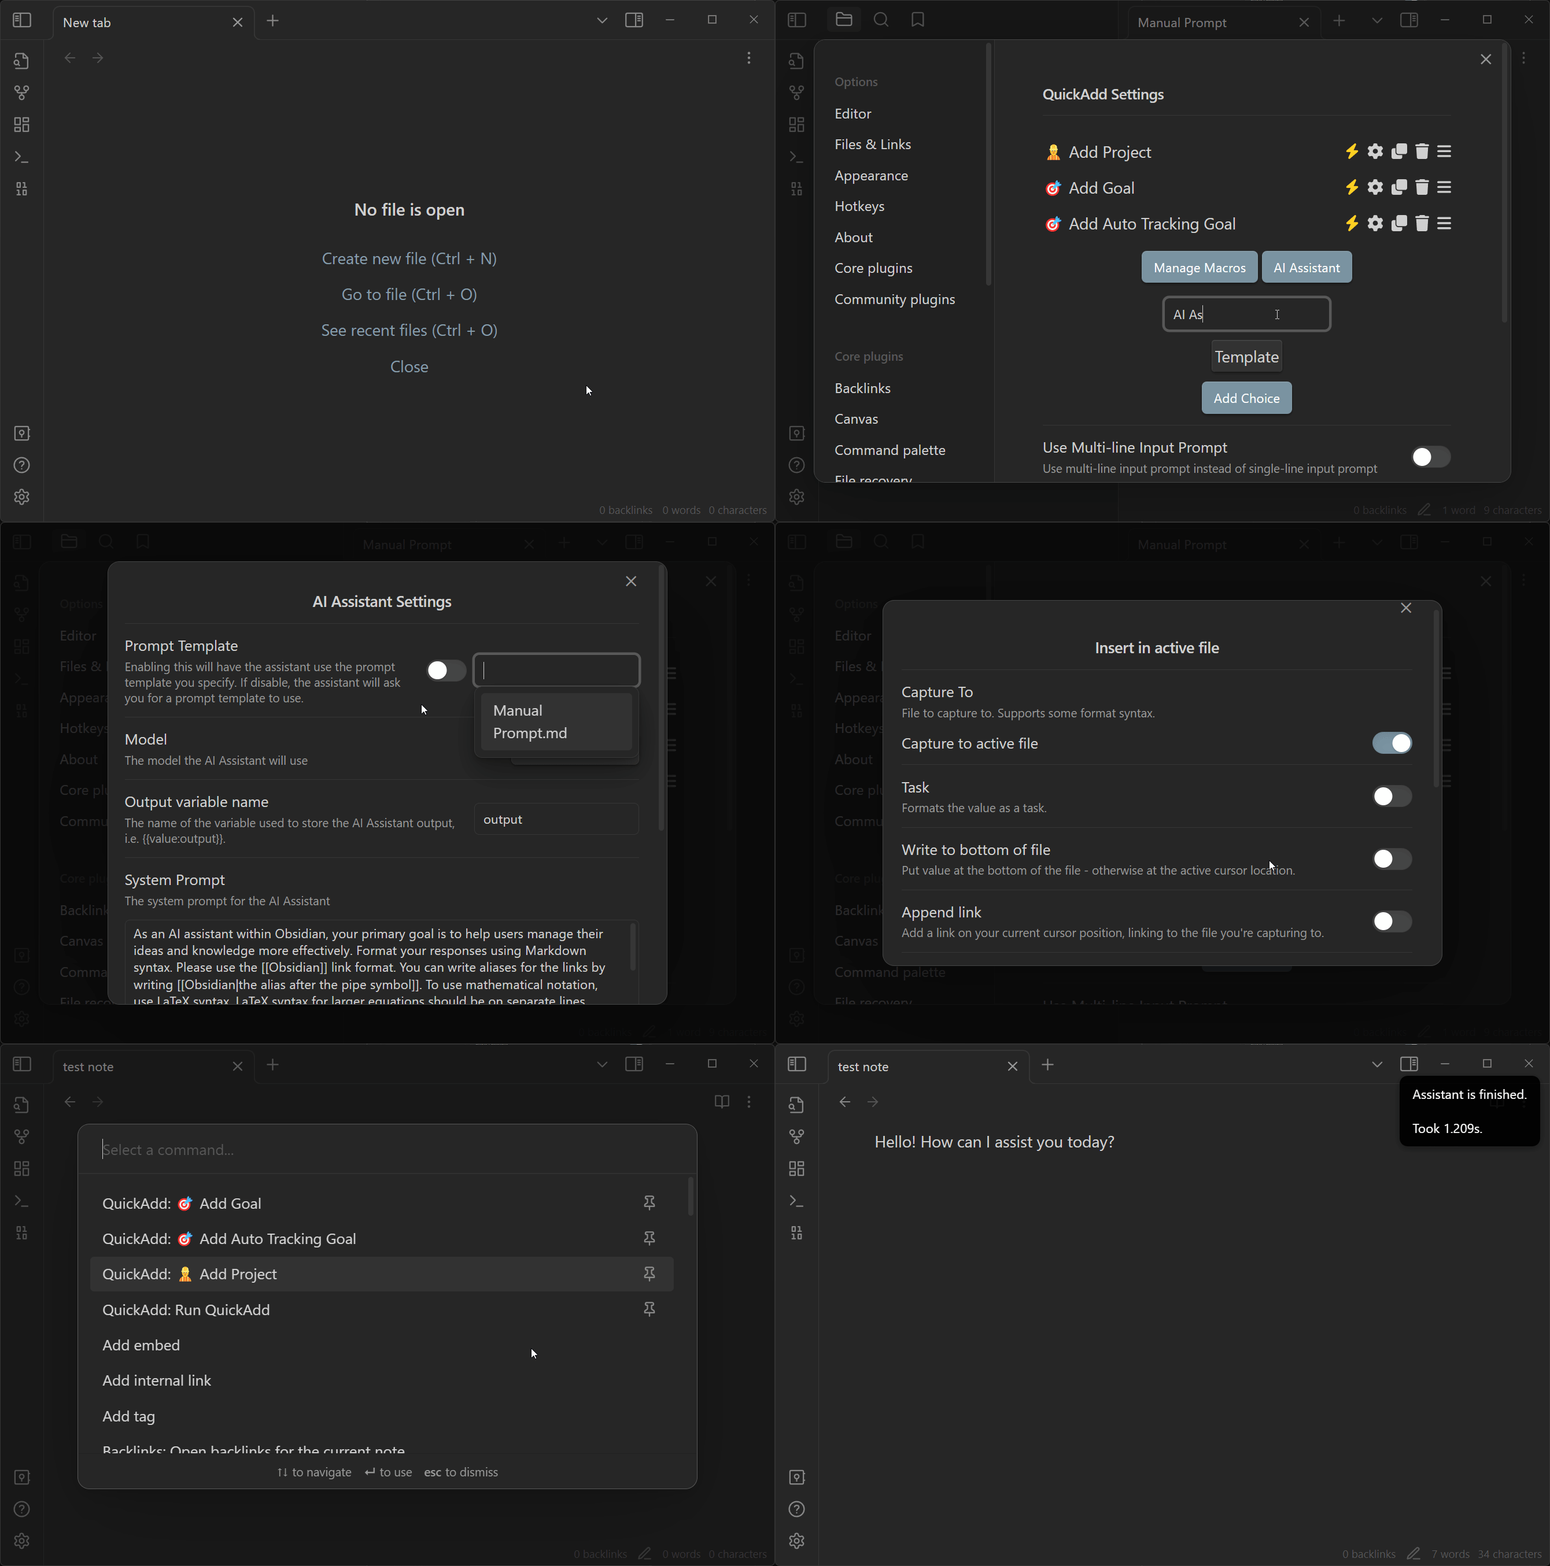
The basic idea is that you set up a QuickAdd Macro, which will trigger the AI Assistant. The AI Assistant will then use the prompt template you specify to generate a prompt, which it will then send to your selected provider. The provider will then return a response, which the AI Assistant passes on to the QuickAdd Macro. You can then use the response in subsequent steps in the macro, e.g. to capture to a note, or create a new note.
Creating prompt templates is simple: just create a note in your prompt templates folder.
Creating prompt templates is as simple as creating a note within your prompt templates folder. These templates can utilize QuickAdd's Format Syntax or Inline Scripts.
Here's an example of how you can set up a prompt template:

You can also use AI Assistant features from within the API.
Providers
QuickAdd supports multiple providers for LLMs. QuickAdd works with OpenAI-compatible APIs and also supports Google Gemini.
Here are a few providers that are known to work with QuickAdd:
Paid providers expose their own API, which you can use with QuickAdd. Free providers, such as Ollama, are also supported.
By default, QuickAdd will add the OpenAI and Gemini providers. You can add more providers by clicking the "Add Provider" button in the AI Assistant settings. This now opens a preset picker with common providers (OpenAI, Gemini, Groq, Together, OpenRouter, etc.). Paste your API key and click Connect to add the provider. You can also add a custom provider.
Here's a video showcasing adding Groq as a provider:
Local LLMs
You can use your own machine to run LLMs. This is useful if you want to keep your data private, or if you want to use a specific model that isn't available on the cloud. To use a local LLM, you need to set up a server that can run the model. You can then add the server as a provider in QuickAdd.
One such server is Ollama. Ollama is a free, open-source, and self-hosted LLM server. You can set up Ollama on your own machine, and then use it as a provider in QuickAdd.
You can find the quick start documentation here.
Ollama binds to the port 11434 (src), so your provider settings would be as follows:
Name: Ollama
URL: http://localhost:11434/v1
Api Key: (empty)
And that's it! You can now use Ollama as a provider in QuickAdd. Make sure you add the model you want to use. mistral is great.
Gemini (Google AI)
Gemini is supported out of the box.
Name: Gemini
URL: https://generativelanguage.googleapis.com
API Key: (AI Studio API key)
Models (add one or more):
  - gemini-1.5-pro (Max Tokens: 1000000)
  - gemini-1.5-flash (Max Tokens: 1000000)
  - gemini-1.5-flash-8b (Max Tokens: 1000000)
Notes:
- Use only supported parameters for Gemini (temperature, top_p). Frequency/presence penalties are not sent to Gemini.
- Make sure "Disable AI & Online features" is turned off in QuickAdd settings to enable requests.
Importing and syncing models
- Use the Model source dropdown inside each provider to choose where QuickAdd discovers models: your provider's
/v1/modelsendpoint, the public models.dev directory, or an automatic mode that tries the provider first and falls back to models.dev. - The "Browse models" button pulls from whichever source you selected, letting you search and multi-select models even for custom OpenAI-compatible endpoints that models.dev does not list.
- Choose Add-only to merge or Replace to overwrite the provider's model list.
- Enable Auto-sync to keep your model list updated; use Sync now for a manual refresh. Auto-sync honors the same model source you picked.
AI Assistant Settings
Within the main AI Assistant settings accessible via QuickAdd settings, you can configure the following options:
- Providers: Configure provider endpoints and API keys.
- Prompt Templates Folder: The location where all your prompt templates reside.
- Default model: The default OpenAI model to be used.
- Show Assistant: Toggle for status messages.
- Default System Prompt Template: Sets the behavior of the model.
For each individual AI Assistant command in your macros, you can set these options:
- Prompt Template: Determines the prompt template to use.
- Model: Specifies the OpenAI model to use, overriding the default model.
- Output Name Variable: Sets the variable name for the AI Assistant’s output.
- System Prompt Template: Determines the models behavior, overriding the default system prompt template.
You can also tweak model parameters in advanced settings:
- temperature: Allows you to adjust the sampling temperature between 0 and 2. Higher values result in more random outputs, while lower values make the output more focused and deterministic.
- top_p: This parameter relates to nucleus sampling. The model considers only the tokens comprising the top 'p' probability mass. For example, 0.1 means only tokens from the top 10% probability mass are considered.
- frequency_penalty: A parameter ranging between -2.0 and 2.0. Positive values penalize new tokens based on their frequency in the existing text, reducing the model's tendency to repeat the same lines. (Not applicable to Gemini.)
- presence_penalty: Also ranging between -2.0 and 2.0, positive values penalize new tokens based on their presence in the existing text, encouraging the model to introduce new topics. (Not applicable to Gemini.)
AI-Powered Workflows
You can create powerful workflows utilizing the AI Assistant. Some examples are:
- Generating Writing Prompts: Using links to related notes to generate writing prompts.
- Summarizer: Create summaries of selected text.
- Transform Selected: Transform selected text based on provided instructions.
- Flashcard Creator: Generate flashcards based on selected text.
- Get Me Started Writing About…: Generate points to kickstart your writing on a given topic.
- Manual Prompt: Provide a manual prompt to the AI assistant.
- Alternative Viewpoints: Obtain alternative perspectives and improvements on your draft.
- Prompt Chaining: Chain multiple prompts together, with each prompt using the output of the previous one.
All of these examples, and more, can be found in Christian's blog post about the AI Assistant.
Please note, using the AI Assistant will incur costs depending on the API usage. Set spending limits on your OpenAI account to avoid unexpected expenses. Play around with different models to find the one that best suits your needs.
Example: Summarizer
Here’s a simple prompt where you select some text, and then use the assistant with that prompt. Then it’ll spit out an AI-generated summary:
Please summarize the following text. Use only the text itself as material for summarization, and do not add anything new. Rewrite this for brevity, in outline form:
{{value}}
You can use the getting-started demonstration shown earlier to set this up.